Vue Internationalization: Getting Started With Transifex Native
7 min read
According to Statista, JavaScript is the most commonly used programming language among software developers worldwide, with more than 65 percent of respondents stating that they used JavaScript alongside HTML/CSS. It’s no surprise that JavaScript localization is in demand.
In this article, we will learn how to do this in two ways: file-based translation, in which we use Transifex to get these translations and use them in our application locally, or Transifex native, which is a cloud-based localization stack whose SDK can be installed or used via CDN and allows us to push and pull content for localization directly with Transifex, without the need for a file.
Many developers use JavaScript to create websites, web applications, mobile apps, and other things. As these products or platforms grow in size, they realize their need for localization.
Localization is the process of displaying content based on specific locations. For example, if a user is in an Arabic-speaking country, you would like the content of your website to appear to that user in Arabic, and the same applies to other languages.
And it’s not just about language. You can use localization to address other forms of media such as images, or even sounds so that you’ll be able to use what locals feel most familiar with.
By conducting research, you can identify all potential target audiences and then work to ensure that your product or web content can be localized so that they can access your content in their native languages.
When it comes to localization, many developers are unsure about which library to use, which platform will be the most efficient, and many other factors.
In this guide, we’ll be showcasing how to localize a JavaScript website or app with Transifex, a platform that makes your localization and internationalization efforts much easier!
There are two ways to go at JavaScript localization:
Find the tutorial’s code on this GitHub repository!
When working on small projects, you may not want to install a library, use a CDN, go through all the configuration exercises, etc. You might want to do everything locally, which is entirely feasible.
Before the evolution of libraries, projects requiring localization had to consult individuals to help translate content and fetch this content from a file, allowing for many similar files with translations for different local languages.
Let’s get started. Assume we have a page like this one that we want to localize:
```HTML
<!-- ./index.HTML -->

<html lang="en">
    <head>
        <title>JavaScript Transifex Demo</title>
    </head>
    <body>
        <div class="container">
            <nav class="navbar">
                <div class="container">
                    <div class="logo">
                        <h1>Local JS</h1>
                    </div>
                    <div class="navbar-right">
                        <select id="localization-switcher" class="locale-switcher">
                            <option value="en">English</option>
                            <option value="fr">French</option>
                            <option value="ar">Arabic (العربية)</option>
                        </select>
                    </div>
                </div>
            </nav>
            <div class="content-section">
                <h1 localization-key="title">
                    Welcome to this localization demo site
                </h1>
                <p localization-key="description">
                    Software localization is the process of adapting software to the culture and language of an end user, from standards of measurement to video and graphic design. It involves translation, design, and UX changes to make software look and feel natural to the target user.
                </p>
            </div>
        </div>
        <script src="./js/script.js"></script>
    </body>
</html>
```
For the time being, all of the content is hard-coded into the page. To perform file-based localization, we need to extract this content into a file, possibly in JSON format, and then retrieve it from the file.
Let’s make a file in a language folder to keep track of all files for different languages:
```JSON

<!-- ./lang/en.json -->

{

    "title": "Welcome to this localization demo site",

    "description": "Software localization is the process of adapting software to the culture and language of an end user, from standards of measurement to video and graphic design. It involves not only translation but also design and UX changes to make software look and feel natural to the target user."

}

```
Let’s now use a fetch request to replace the static content in the HTML file with the content from this JSON:
```js

<!-- ./js/script.js -->

let translations = {};

const fetchContent = () => {

    return fetch(`lang/en.json`)

        .then((response) => {

            return response.json();

        })

        .then((data) => {

            translations = data;

            translatePage();

        });

};

fetchContent();

const translatePage = () => {

    document.querySelectorAll('[localization-key]').forEach((element) => {

        let key = element.getAttribute('localization-key');

        let translation = translations[key];

        element.innerText = translation;

    });

};

```
We retrieved the entire content from the JSON file in the preceding code. We then used the `querySelectorAll()` method to find all elements with the `localization-key` property that we had assigned in our HTML file, looped through to see the attribute that matched the `key` of our object, and then embedded the data.
So far, we’ve seen how to read data from a file using JavaScript. For file-based localization, Transifex allows us to upload the source file, which is the English version of our content for this demo (`en.json`).
Then you also get a platform to translate your content with help from translations. After that, we can download the translated file and fetch the localized content.
Let’s look at how we can create a file-based project on Transifex and then upload our source content for translation. We’ll take care of the translation and download the translated content.

The first step is to create a Transifex account. Sign up with your GitHub, Google, or LinkedIn account, free for 15 days, and free forever for open-source projects!
After you’ve created an account, you’ll need to create a project. You must give your project a name and select “File-based” as the project type.
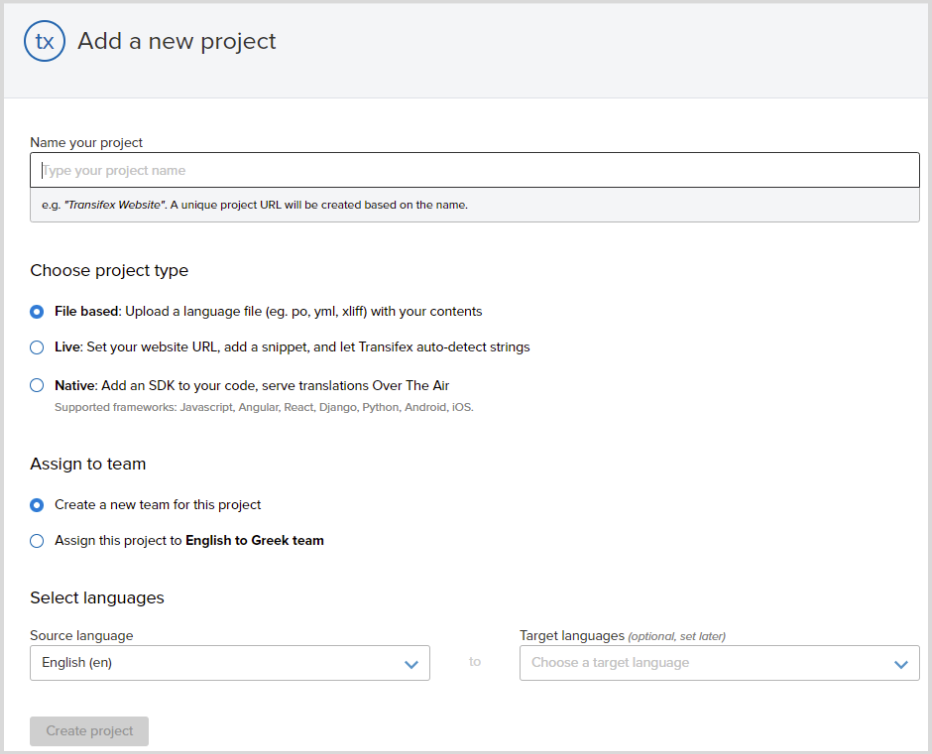
Finally, you must specify your application’s primary language and the language(s) into which we will translate it. I’ll use English as the primary language for this guide, with French and Arabic as my target languages.
Note: Uncheck the box that asks if you want to add a demo file automatically unless you want to use it to test the Transifex platform first.
When you finish, click the “Create Project” button.
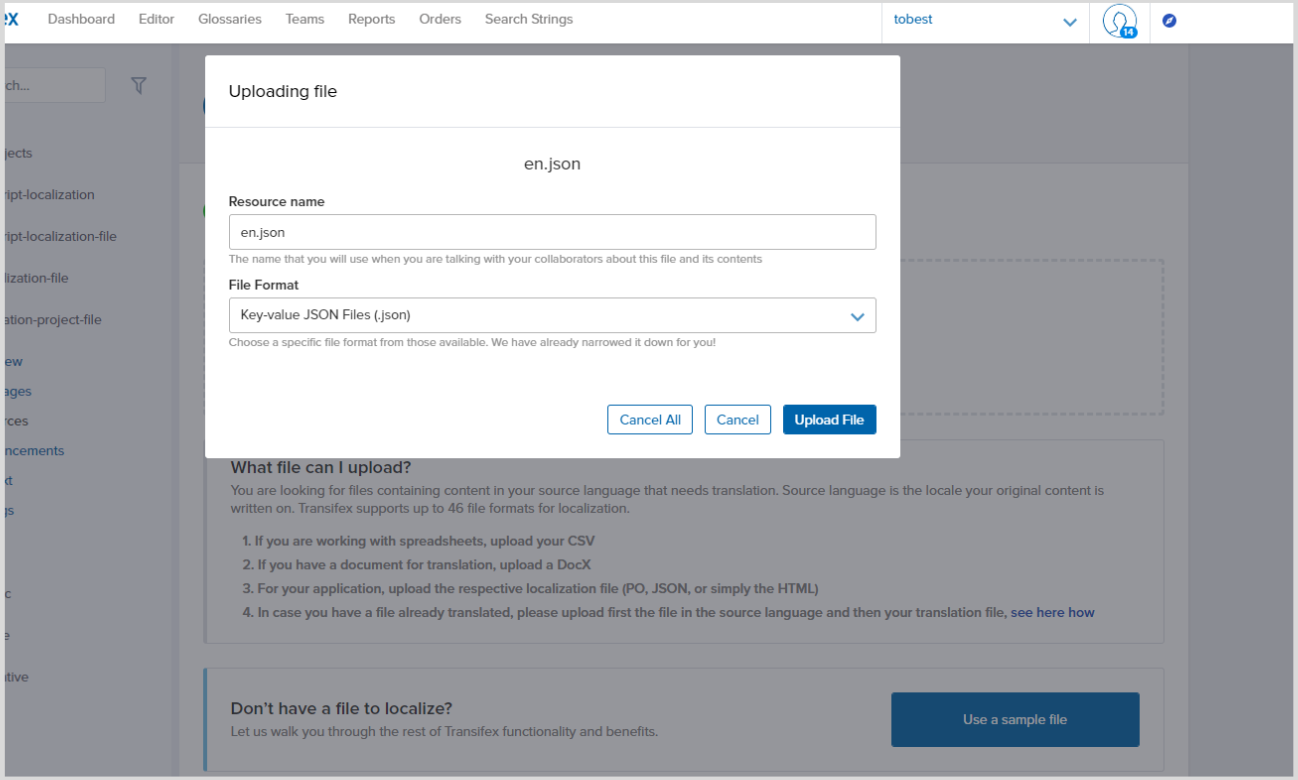
Following that, we will direct you to the next page, where you can upload your source file in any supported format. but we will use the JSON format.
After creating your project, select the “Upload file” button to upload your extracted JSON file:
After that’s done, you are ready to start translating your content into the editor!
We can now download the translated file after successfully translating it to use the content in our application. To download, navigate to your project’s language tab, click on the file, and then select “Download only reviewed translations” Transifex will allow us to download a JSON file of your translated language:
>Note: Ensure you save the file with the locale name in the `lang folder we created earlier, e.g., `./lang/ar.json`.
So far, we’ve been able to translate our source file (`en.json`) into Arabic (`ar.json`), and we have saved both in the languages folder (`lang`). We were previously able to load data from the source file.
Now, let’s see how we can load our translations asynchronously:
```js

const locale = 'ar';

let translations = {};

document.addEventListener('DOMContentLoaded', () => {

    setLocale(locale);

});

const setLocale = async (newLocale) => {

    translations = await fetchTranslations(newLocale);

    translatePage();

};

const fetchTranslations = async (newLocale) => {

    const response = await fetch(`lang/${newLocale}.json`);

    return await response.json();

};

const translatePage = () => {

    document.querySelectorAll('[localization-key]').forEach((element) => {

        let key = element.getAttribute('localization-key');

        let translation = translations[key];

        element.innerText = translation;

    });

};

```
The code above is very similar to the code we used to retrieve data from the source file. We’re doing it asynchronously, so it loads content based on the `locale` parameter. Let’s go over the code again.
First, we declared two variables to specify the locale we want to retrieve based on the available locales. As we can see, we set ours to `ar`, which is the language code for Arabic:
```js

const locale = 'ar';

let translations = {};

```
We then created an `addEventListener()` that gets triggered when the page content is readily using the `DOMContentLoaded` event. In this `addEventListener()` we called the `setLocale()` function and passed the `locale` variable.
```js

document.addEventListener('DOMContentLoaded', () => {

    setLocale(locale);

});

```
The core function is `setLocale()`, and it performs two major tasks: loading translations for the given locale and translating the page to show specified language localized content:
```js

const setLocale = async (newLocale) => {

    translations = await fetchTranslations(newLocale);

    translatePage();

};

```
As seen in the `setLocale()` function, we first fetched our translations, and as we can see, we used async/await to get the translations before triggering the function that will load our page with the fetched content. We passed the locale to the `fetchTranslations()` function and used it to retrieve content from the locale file:
```js

const fetchTranslations = async (newLocale) => {

    const response = await fetch(`lang/${newLocale}.json`);

    return await response.json();

};

```
Finally, when we have gotten the content, we now pass this content to our page, so it appears using the second function in the setLocale function, which is `translatePage()`:
```js

const translatePage = () => {

    document.querySelectorAll('[localization-key]').forEach((element) => {

        let key = element.getAttribute('localization-key');

        let translation = translations[key];

        element.innerText = translation;

    });

};

```At this point, we can load our translated content, and if we have a large number of files, all we have to do is change the value of our locale variable to match the translated file, which will fetch the content. However, this is not the best approach because users will not have access to our code base. We want users to be able to switch between languages using our UI.
We added a select tag in the HTML code that has a drop-down indicating languages; let’s now write the logic that will help us get the value from the drop-down and pass it to our previous code:
```js

const switcher = document.getElementById('localization-switcher');

switcher.onchange = (e) => {

    // Set the locale to the selected option's value

    setLocale(e.target.value);

};

```
All we did was get the select tag by its id and then pass the `onChange()` event so we could set the locale to the value of the selected option, as seen above.
Finally, suppose we want to use the user’s default locale stored in the browser. In that case, we can do so via the navigator JavaScript object, and we can also handle errors so that if a user selects a language with no translation, we can choose to leave the content as a specific locale:
```js

let translations = {};

document.addEventListener('DOMContentLoaded', () => {

    setLocale(defaultLocale);

});

const switcher = document.getElementById('localization-switcher');

switcher.onchange = (e) => {

    setLocale(e.target.value);

};

const setLocale = async (newLocale) => {

    translations = await fetchTranslations(newLocale);

    translatePage();

};

const fetchTranslations = async (newLocale) => {

    const response = await fetch(`lang/${newLocale}.json`);

    if (!response.ok) {

        console.log(`Could not fetch translations for locale ${newLocale}`);

    }

    return await response.json();

};

function translatePage() {

    document.querySelectorAll('[localization-key]').forEach((element) => {

        let key = element.getAttribute('localization-key');

        let translation = translations[key];

        element.innerText = translation;

    });

}

```
So that’s the file-based JavaScript localization approach.
If you want a more streamlined solution, consider the fileless approach.
Note: This method might not work due to CORS issues on specific browsers since we are requesting a file. The best solution would be to run the application on a local or a remote server.
The fileless approach is what we call “Transifex Native”. This enables you to allow the localization platform to directly communicate with your codebase and pull/push content automatically. You basically almost completely get rid of all the required steps that come with the file-based approach.
As previously stated, English will be the primary language, with French and Arabic as my target languages.
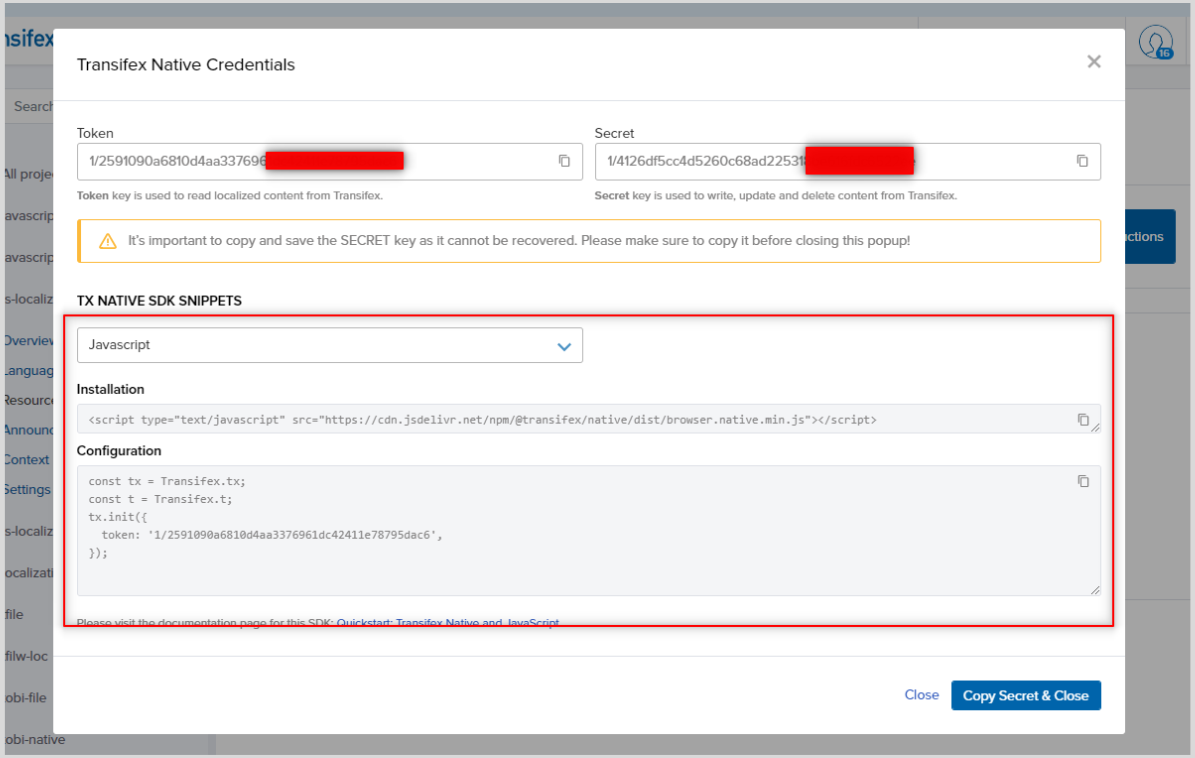
When you finish, click the Create Project button, which will direct you to the next page, where you’ll find instructions for creating credentials for your project.
At the bottom of the page, click “Generate Native Credentials Now“. The API _token_ and _secret_ key will be displayed in a pop-up window. Duplicate both keys and keep them in case you need them later. This will also show us the configurations we will use in our JavaScript file.
Once that is done, we can now proceed to push the content to Transifex and then localize it.

The first step in using Transifex native is to configure it. There are numerous ways to do this, as seen in the Transifex JavaScript documentation.
But for this guide, we will make use of the CDN, and later when we want to push our content, we will use the Transifex CLI.
We’d add the CDN to our HTML file, and then we’d be able to use Transifex directly in our JavaScript file:
```HTML

<!DOCTYPE html>

<html lang="en">

    <head>

        <title>JavaScript Transifex Demo</title>

    </head>

    <body>

        // ...

        <script

            type="text/javascript"

            src="https://cdn.jsdelivr.net/npm/@transifex/native/dist/browser.native.min.js"

        ></script>

        <script src="./index.js"></script>

    </body>

</html>

```
Once this is done, we can now head to our JavaScript file to configure transfer using the key we got earlier when creating our project:
```js

const tx = Transifex.tx;

const t = Transifex.t;

tx.init({

    token: 'ADD TOKEN KEY HERE.'

});

```Transifex has now been successfully configured locally in our JavaScript file.
With the file-based approach, we had to upload our content JSON file to Transifex, but now we want to directly push our content without using any external files, which can be accomplished with Transifex CLI.
To do this, we first have to create a package.json file and then install the Transifex CLI dependency by running the commands below:
```bash

$ npm init -y

$ npm install @transifex/cli --save

```
Once this is done we will see that Transifex CLI has been installed in our packe.json file dependency object:
```JSON

"dependencies": {

    "@transifex/cli": "^4.2.2"

}

```
We can now proceed to push our content with the `t` function. As we can see below, we also used the `_key` parameter to give each content a key, so it’s easy to fetch these content later:
```js

const tx = Transifex.tx;

const t = Transifex.t;

    tx.init({

        token: 'ADD TOKEN KEY HERE',

    });

    t('Welcome to this localization demo site', {

        _key: 'title',

    });

    t(

        'Software localization is the process of adapting software to both the culture and language of an end user, from standards of measurement to video and graphic design. It involves not only translation, but also design and UX changes to make software look and feel natural to the target user.',

        {

            _key: 'description',

        }

    );

```
So far, we have initialized the content we want to push to Transifex for localization. Let’s now push the content with the `@transifex/cli` library, which will collect all translatable strings and push them to Transifex using the following command:
```

$ ./node_modules/.bin/txjs-cli push src/ --token=<PROJECT TOKEN> --secret=<PROJECT SECRET>

```Note: In the command above, ensure you add your token and secret key. You will also notice that we use `src/`, which means this command will look for the `index.js` file in the `src` folder.
The `index.js` file is the file that contains the content we want to push. Ensure you place your HTML, CSS, and JavaScript file in an `src` folder as seen in this GitHub repository
Pulling content from Transifex is similar to how we previously retrieved data from JSON files. The only significant difference is that we no longer use the fetch API for data retrieval:
```js

const locale = 'ar';

document.addEventListener('DOMContentLoaded', () => {

    setLocale(locale);

});

const setLocale = (newLocale) => {

    tx.setCurrentLocale(newLocale)

        .then(() => {

            translatePage();

        })

        .catch((err) => console.log(err));

};

const translatePage = () => {

    document.querySelectorAll('[localization-key]').forEach((element) => {

        let key = element.getAttribute('localization-key');

        let translation = t(key);

        element.innerText = translation;

    });

};

```
In the code above, we specified the locale from which we wanted to retrieve its localized content. We created a function to retrieve the data, which is the `setLocale()` method, and finally, we used the `translatePage()` method to help get each content based on the `key` and pass it to the UI.
By default, any changes to translations made in Transifex, will almost instantly become available in the app using the Transifex Native SDK. You can have more control on which translations go live by using the filtering options to serve translations based on a translation’s status. A translated string can have the following additional statuses: reviewed, proofread (if enabled in the workflow), finalized (an alias to reviewed or proofread, depending on the latest configured workflow step). You can read more on the release management here.
Just like we did for the file-based JavaScript localization, we can do the same with Transifex native, as all we want to do is get the value and pass it into the `setLocale()` method:
```js

const switcher = document.getElementById('localization-switcher');

switcher.onchange = (e) => {

    setLocale(e.target.value);

};

```
So far, we’ve been able to implement localization using Transifex native; however, we can also choose to detect the user’s preferred locale from the browser and use it as the initial locale with the JavaScript `navigator` object. We can also handle errors so that if a locale is passed that is not available, it returns any other specified locale as a fallback:
```js

const defaultLocale = navigator.language.split('-')[0];

document.addEventListener('DOMContentLoaded', () => {

    setLocale(defaultLocale);

});

const switcher = document.getElementById('localization-switcher');

switcher.onchange = (e) => {

    // Set the locale to the selected option[value]

    setLocale(e.target.value);

};

const setLocale = (newLocale) => {

    tx.setCurrentLocale(newLocale)

        .then(() => {

            translatePage();

        })

        .catch((err) => console.log(err));

};

const translatePage = () => {

    document.querySelectorAll('[localization-key]').forEach((element) => {

        let key = element.getAttribute('localization-key');

        let translation = t(key);

        if (translation === key) {

            console.log(`Translation not found for key: ${key}`);

            setLocale(defaultLocale);

        }

        element.innerText = translation;

    });

};

```Βefore wrapping up this guide, the content direction is one major feature we would always want to implement when dealing with localization. Each language’s content is displayed differently. For example, English is displayed left to right (`ltr`), whereas Arabic is shown right to left (`rtl`).
Our content is displayed in `ltr` format by default, but we can add logic to handle direction for some specific languages, and this applies to both methods covered in this guide:
```js

const setLocale = async (newLocale) => {

    // ...

    document.documentElement.dir = direction(newLocale);

};

const direction = (locale) => {

    return locale === 'ar' ? 'rtl' : 'ltr';

}

```
The above checks if the locale is equal to `ar` and returns the specified direction, which gets effected using `document.documentElement.dir`.
In this JavaScript localization guide, we learned the two major methods for implementing JavaScript localization: File-based and fileless.
To summarize, both methods work flawlessly, but the file-based approach becomes extremely difficult to manage for large projects. Hence, the most significant advantage of using Transifex Native is that the translations are not included in your codebase, as we just saw.
I sincerely hope this article was helpful, and if you require additional information, please see the Transifex documentation.